


Table of Contents
You need to have good photos of your products for e-commerce to work. If you want to get images that seem professional and will help you sell, you might want to hire a ghost mannequin photography service provider.
You might be wondering how this works. The ghost mannequin photo editing method generates product photos that look like they were taken by a pro and don’t have any extra stuff in them. It makes it look like someone who isn’t there is wearing the garments. This type of ghost mannequin product photography removes distractions so that people who might buy the clothes can focus on how they fit, their shape, and what makes them special.
Using ghost mannequin services and ghost mannequin picture editing services is a terrific way to get people interested in your products and directly increase your sales, which will help your online business grow.
What is Ghost Mannequin Photography?
The invisible mannequin technique, often known as ghost mannequin photography, is a common way to show off merchandise online.
To use this method, you first take a picture of a piece of clothing on a model or mannequin and then edit the picture digitally to remove the support system. The final result is an image that looks like a mannequin is wearing the garments or that they are merely “floating” in the air.
This strategy is quite popular with e-commerce firms because it:
- Adds Dimension: It gives things their shape and form so that buyers can see how they fit and hang.
- It ties everything together: Having the same editing style and background on all of your product listings (like big retailers do) makes the whole store look neat and consistent.
- Drives Conversions: The combination of a professional style with clear pictures makes items more appealing, easier to peruse, and particularly good at attracting clients’ attention and making them buy.
Why Ghost Mannequins Are Important for Online Shopping
The ghost mannequin approach has several fantastic benefits that make it a must-have for e-commerce businesses today. It makes their products look a lot better in lookbooks, catalogues, and online marketplaces.
| Benefits | Reason |
| Gives objects a 3D appearance | This strategy helps clients imagine how the garments will look on them. It adds depth and texture to the clothes, making them look like you’re trying them on in person. |
| Focuses on Fit and Form | Ghost mannequin photography is a terrific way to show how clothes really fit, how they look, and how they hang. This makes it less likely that shoppers will be confused about how the item will fit. |
| A cheap way to solve the problem | The ghost mannequin replaces expensive fashion models, which saves e-commerce companies money on studio time, personnel fees, and model coordination while still giving them high-quality, professional-looking pictures. |
| Keeps things the same | The strategy lets you consistently snap images of products. This helps all of the products on your site look neat and consistent, which improves the entire shopping experience. |
| Saves time | When editing, it’s usually easier and takes less time to digitally remove a mannequin than to conduct a lot of retouching on live fashion models or elaborate flat-lay setups. |
In the end, the ghost mannequin method is a simple solution for online retailers to make their displays better, save money, and attract more customers to buy.
Getting Ready for the Shoot
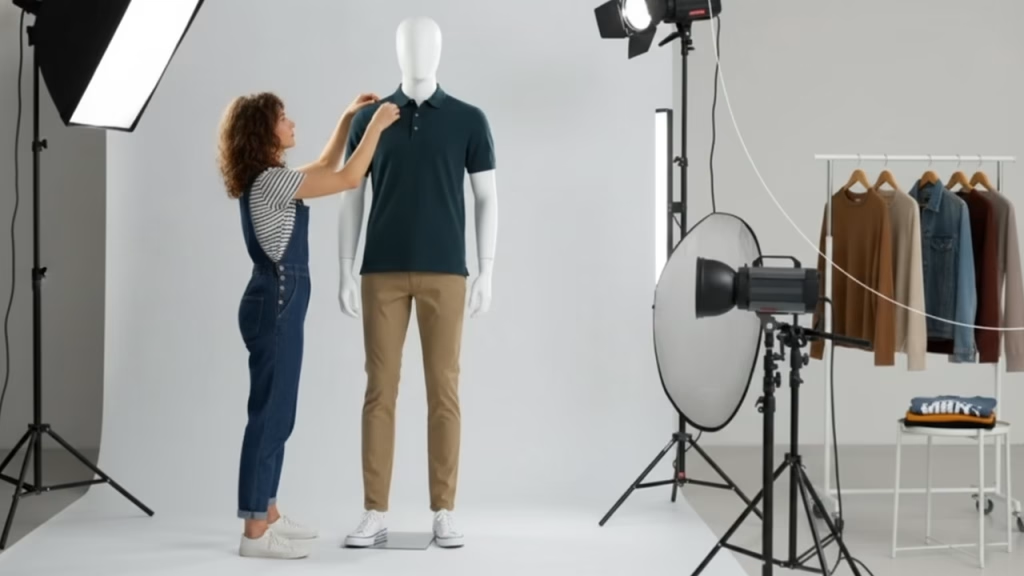
Getting ready for a ghost mannequin photo shoot means getting the clothes ready, picking the proper mannequin, and making sure the space is clean and well-lit. For the best results, make sure your clothes are free of wrinkles and fit the mannequin well.
Picking the Right Model or Mannequin

Keep this in mind before you start capturing images for the ghost mannequin effect: the clothes are the most important part. If the garments seem bad in real life, no amount of manipulating the Invisible Ghost Mannequin pictures will help.
To get your garments ready for high-quality e-commerce photography:
- Preparation is important: Check the clothes thoroughly for any problems. Take away all the lint, loose threads, wrinkles, or marks. Customers will trust you right away if you keep things clean.
- Sharp Lines: The lines need to be sharp and clean for a high-end look. Ironing or steaming the collar, sleeves, and back makes them look sharp, which is vital for the final “hollow man” picture.
- Make it look real: No matter what kind of mannequin you have, full body, ¾ torso, or just the neck, the garments need to hang like they would on a real person. Fill out the arms, shape the thighs and legs, define the abdomen, and make the hands look natural with pins, clips, or tissue paper.
People make quick decisions based on what they see, so a well-prepared piece of apparel straight away suggests that the store is high-quality and trustworthy. What type of clothes (such as shirts, pants, or dresses) do you find it difficult to get ready for the ghost mannequin method?
Setting Up Your Studio

Keep your background simple so that the clothes are the main emphasis. Pick a colour that is white, light grey, or has a soft texture that doesn’t stand out. A clean, consistent background prevents people from becoming sidetracked and makes editing much easier.
Make sure you have enough space to move around. You need adequate space to operate around your mannequin and camera equipment easily. A professional tip for keeping things the same is to use tape or markers on the floor to denote where your mannequin and tripod should be. This makes sure that they go back to the same spot for each product shot, which is critical for smooth batch editing.
Picking the Right Light
The lighting in your ghost mannequin shot is what really makes or kills it. Getting soft, even light, is your main goal. Harsh shadows are the worst thing that can happen to you, and they will make post-processing much harder.
In a typical professional setup, three lights are used to create a clean, consistent look that clients can trust:
- Main (Key) Light: The light that makes the clothes look dazzling.
- Fill Light: This light is put in to get rid of the shadows generated by the main light and make them softer.
- Background Light: This maintains your white background bright and clean so that the garments shine out.
Softboxes and huge diffusers are fantastic because they make the light softer and more even. If you buy a cheap but good lighting system now, you won’t have to change it later.
List of Suggested Equipment
Here is a quick list of the most critical equipment you need to make ghost mannequins look professional:
| Kind of Tools | Suggested Specification | What is the Goal? |
| Dress Form or Mannequin | It’s white and not shiny, and you can take off parts like the arms and neck to make it easy to change the ghost mannequin. | The product’s base. |
| Camera | A DSLR or mirrorless camera with full manual controls. | To preserve the same amount of light. |
| Lens | A prime lens that has a fixed focal length of 50mm or 85mm. | Fixes the clothes. |
| Light | At least two LED panels or softbox lights that are on all the time. | To make the light soft and even. |
| A Tripod | Strong and stable. | Keep your camera stationary. |
| Background | A white piece of paper or fabric that has no seams. | Gives you a clean background. |
| Styling Tools | Clips and pins. | To make sure the fabric drapes naturally and fits the mannequin well. |
If you put your lighting first and employ the right equipment, your finished work will look high-end, and the whole process will go much more smoothly.
Taking pictures from different points of view

Show the entire product. Move beyond the primary view. Photograph small details. Capture vital features. Make clients confident in their purchase.
This means taking images from different angles to show:
- Get close-up shots of features like stitching, hardware (such as buttons and zippers), or any patterns that stand out. People think the quality is better because of these details.
- You could want to take a picture of the garment laid out flat or even inside out. This shows how skilfully the construction is done, the seams on the inside, and any special tags or labels. These flat-lay pictures can also aid you later when you take the mannequin out of the picture and need to fill in some of the inside, like the back of the neckline.
- To show off the main item from several angles, presenting pictures of it with other things that go well with it.
It takes more work to shoot images from multiple perspectives, but it gives the buyer a full “virtual try-on” experience and makes them trust your products.
How to Use Photoshop to Remove the Mannequin
Remove the mannequin in Photoshop. Use selection tools. Apply layer masks. Employ retouching methods. Preserve the garment’s shape. Maintain its texture. Achieve a professional finish. Perfect your eCommerce presentation.
Step 1: Open your picture and apply layers to it
This is the first step in changing your photo to make it look like a ghost mannequin. Setting up a clean workflow today can help you save time when you edit later.
- Open Your Image: The first step is to open the principal picture editing programme for your item.
- Create Background Layer: To add a new background layer, click on the menu and choose “Add Layer.”
- Fill the Background: The last colour for the background of an e-commerce site is normally white, but it can be helpful to fill this new layer with black as you work on it. A black backdrop layer makes it much simpler to view your options and the edges of the clothes as you start to separate and take away the mannequin.
- Make it changeable: To make sure the background layer can be changed, double-click it and give it a name that describes it, such as “Back” or “Final Background.”
A good retouching service usually handles layers this carefully. It makes sure that the process of retouching the image is clean and doesn’t affect the original.
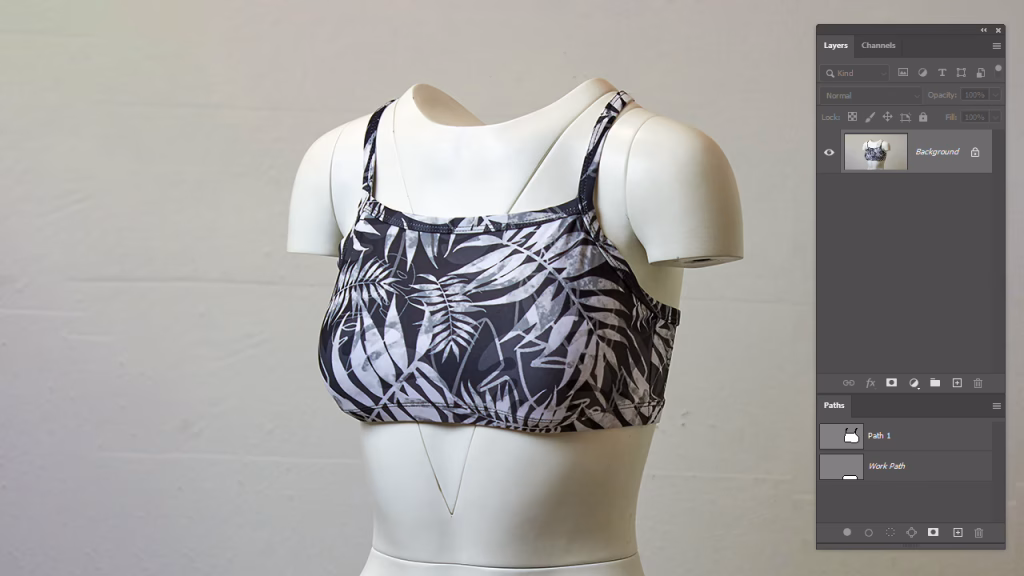
Step 2: Use the Magic Wand Tool to pick the background.

- In the Layers menu, open Photoshop and choose the front layer.
- To switch to the Magic Wand Tool, click and hold the Quick Selection Tool and then choose the Magic Wand Tool.
- Use “Select & Mask” to improve your choices for the background and topic.
Step 3: Get rid of the mannequin in the picture.

- Select the Quick Selection Tool and then click on “subtract” in the selection bar.
- Click on the mannequin parts to get rid of them, and then use the Eraser Tool to smooth off the edges.
Step 4: Apply the Layer Mask

- Click the Layer Mask icon to hide the background.
- To get rid of any mannequin parts that are still there, use the Eraser Tool with a white foreground colour.
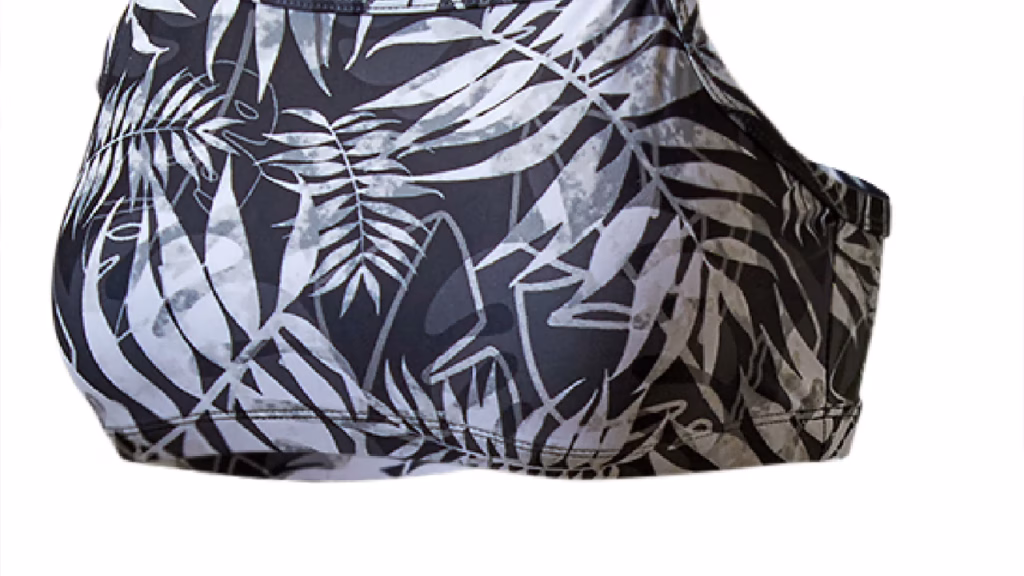
Step 5: Fill in the empty spots with liquid.
- To modify the clothes or fill in any gaps, go to Filter > Liquify.
Step 6: Touching Up and Ironing

- Hold down Alt/Option and use the Clone Stamp Tool to fix creases and other problems.
Step 7: Decide what to do on the inside

- To choose the interior of the clothes from a separate picture (such as the neck area), use the Rectangular Marquee Tool.
- Put the selection on the front layer and line up the pieces.
Step 8: Add and Put Back Part
- With the Transform Tool, add and move the back part of the garments.
- Make sure the back and front fit together well.
Step 9: Cut and change the back part
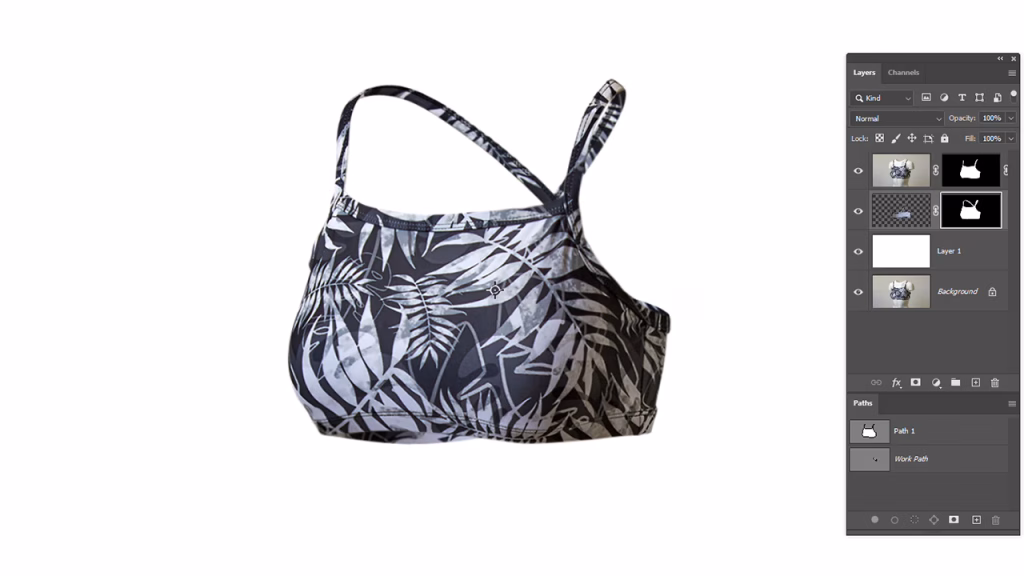
- Use the Path Tool to cut off the back part, adjust the anchor points, and get rid of whatever you don’t want.
- Press Command/Control + Shift + I to flip and get rid of superfluous areas.
Step 10: Put in a shadow

- Add a drop shadow to the front layer to make it look real.
Step 11: Get rid of the shadow on the outside

- To get rid of undesirable shadow areas, right-click on the shadow, choose “Create a Layer,” and then flip it over and remove it.
Step 12: Make sure your work is safe

- Check your work one more time, make any changes, and then save it as a PSD or TIFF file so you may tweak it later.
Flat Lay Photography vs. Ghost Mannequin

If you can afford it, utilising both ghost mannequin and flat lay photography for the same piece of clothing is a terrific idea because it enables you to show off all the details that other methods or just fashion models might miss.
Ghost mannequin photographs are a great way to show how something fits and how it looks, much like using real models, but for a lot less money. On the other hand, flat lays are fantastic for showing off important product information and delivering styling tips in context.
When you offer a custom item, such a tweed jacket with a leather interior, you can utilise the following:
- Ghost Mannequin: Put the jacket on a mannequin with a shirt and tie to show off how it fits and how it looks.
- Flat Lay Photography: To get a close-up look at critical details like custom labels, the leather lining on the interior, the texture of the cloth, or distinctive compartments. You can even construct fun lifestyle collages with flat lays and objects that go nicely together.
Combine both tactics. Offer a complete visual experience. Build customer confidence.
Advantages of Hiring Path Edit Provider
Professional ghost mannequin services ensure perfect pictures. They deliver great quality. Your products look more appealing. These services save you time. They handle all editing. You focus on growing your business.
- Experience and Knowledge
Path Edit Provider employs a skilled team. They have years of photo editing experience. They ensure your ghost mannequin photos excel.
- Fast Turnaround Time
Path Edit Provider values your time. Their ghost mannequin service is fast.
It maintains excellent quality. Your product shots are ready on schedule.
- Prices that are reasonable
Path Edit Provider offers clear pricing. Costs are reasonable. This suits businesses of all sizes. You receive expert quality. You pay an affordable price.
- Custom Solutions for Each Client
Path Edit Provider customizes its service. They work with clothing or accessories. Your final images match your brand style. They reflect your business feel.
- Being Careful with the Details
Path Edit Provider focuses on every detail. They remove the mannequin properly. Their layering is perfect. Their retouching is flawless. Their work shows your garment’s structure. It highlights your clothing’s style. The result is clean and professional.
Path Edit Provider delivers the best ghost mannequin results. Their experienced team is dedicated to quality. They enhance your product images. Your online store appears professional and appealing. They serve small businesses and major brands.
Last Thought
Excellent ghost mannequin photos show clothing clearly. They reveal important details. This improves the product’s appearance. Engaging photos boost sales. They increase customer satisfaction. Elevate your store today. Visit Path Edit Provider today to get started with ghost mannequin services!
FAQs
1. What is a mannequin that appears like a ghost?
A ghost mannequin displays clothing online. No model is required. It creates a hollow form. Customers see the fit. They view the construction. The look remains clean and professional. Photograph garments from multiple angles. Remove the mannequin in editing.
2. How much does it cost to take pictures of ghost mannequins?
Costs depend on the service provider. They vary by clothing volume. Session complexity affects price. Basic service costs ten to fifty dollars per image. High-end service reaches one hundred dollars or more.
3. How to Create a Ghost Mannequin
Photograph the garment from multiple angles. Remove the mannequin in Photoshop. Merge the layers seamlessly. Create a hollow floating effect. Use layer masking and retouching. Refine the final image.